I’ve recently been setting this website up to use SSL. To do so I used a couple of great guides and tools on the internet. I got my SSL certificate for free from StartSSL. I found the guide by Eric Mill invaluable to working through the relatively poor UI that StartSSL has to gain the free certificate.
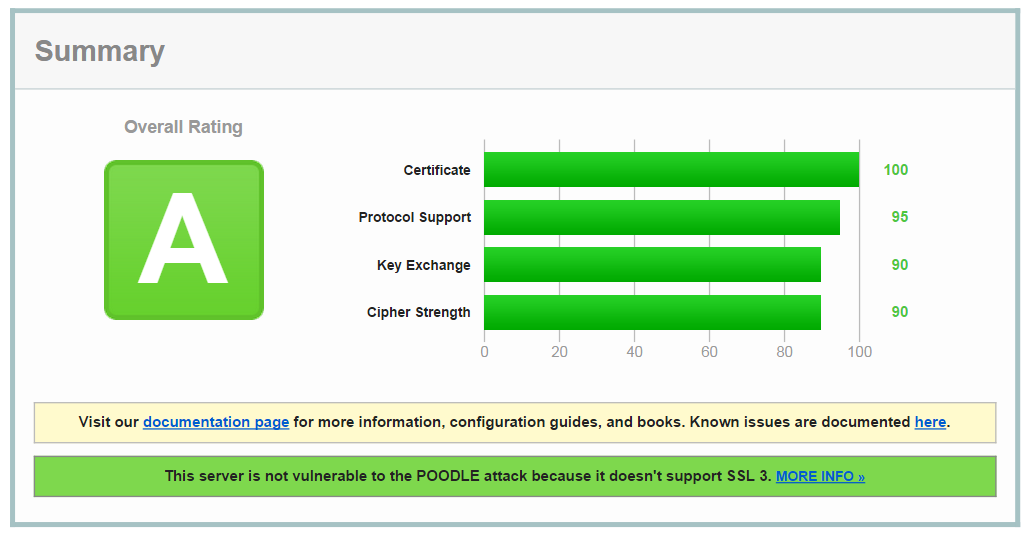
To check the state of your SSL certificate you can the SSL Test Tool from Qualys SSL Labs.
To start with I received a C grade. I had two things to remedy:
- I had SSL3 enabled which is vulnerable to an attack called POODLE
- I did not have Perfect Forward Secrecy enabled, which prevents back decryption of previous conversations even when an attacker gains access to your private key (which happened with Heartbleed).
To remedy both these elements I needed to set Apache to use the correct SSL Protocols and the correct ciphers. More specifically I had to prioritize the ciphers that I preferred clients to use. By specifying the more secure ciphers first, clients that support it, will use Forward Secrecy as a priority.
Using Webmin you can go to Servers -> Apache Webserver -> Global Configuration -> Edit Config files
Comment out the existing SSL config. Change to the following:
SSLProtocol all -SSLv2 -SSLv3
SSLHonorCipherOrder on
SSLCipherSuite "EECDH+ECDSA+AESGCM EECDH+aRSA+AESGCM EECDH+ECDSA+SHA384 EECDH+ECDSA+SHA256 EECDH+aRSA+SHA384 EECDH+aRSA+SHA256 EECDH+aRSA+RC4 EECDH EDH+aRSA RC4 !aNULL !eNULL !LOW !3DES !MD5 !EXP !PSK !SRP !DSS"
I got this from Configuring Apache, Nginx, and OpenSSL for Forward Secrecy. See the Apache section.
If you want to install your SSL certificate in VirtualMin, you need to select your virtual server, then go to Server Configuration -> Manage SSL Certificate.
By default VirtualMin will have install a self-signed certificate, which sadly could be MITMed, which is why we are using the certificate from StartSSL, since they as a Certificate Authority have verified who I am (in the loosest sense of the word, by validating they can send an email to the domain for which I am trying to request a certificate for). More expensive certificates require you to prove your actual identity. More more expensive certificates allow you to have one certificate for multiple subdomains. The whole thing is a racket but I digress.
Luckily a new EFF backed program is coming called Let’s Encrypt, which will issue free certificates and they will be easy to install. This guide will become obsolete (is the hope).
Back to VirtualMin we need to install the certificate that StartSSL has provided us. You need to upload the signed certificate and the private key you used, but you need it in a PEM format. To do that you can use the following command:
openssl rsa -in mydomain.com.key -outform PEM -out mydomain.com.pem.keyYou can now upload that via VirtualMin. Now you also need to rest of the certificate chain. You want to get the SHA-2 version since SHA-1 is vulnerable. You can download the Class1 StartSSL PEM file directly from StartSSL.
Now go to the CA Certificate tab and upload that file. Once uploaded you should see the following:
| Certificate authority name | StartCom Class 1 Primary Intermediate Server CA |
| Organization | StartCom Ltd. |
| Issuer name | StartCom Certification Authority |
| Issuer organization | StartCom Ltd. |
| Expiry date | Oct 24 20:54:17 2017 GMT |
| Certificate type | Self-signed |
If you don’t take the SHA-2 certificate then you’ll be downgraded. Google will also be downgrading sites that use SHA-1 based on this too in the future so it is worth getting right now.
To check your SHA configuration, you can use the wonderful shaaaaaaaaaaaaa.com.
Once you have completed this guide, you should get an A grade on the SSL Labs page.
