Building a Distributed Workflow App with .NET Aspire and Temporal
Part 1: Architecting a Temporal-based Workflow App with .NET Aspire
In this post, I will kick off a multi-part series on building and deploying a resilient, distributed workflow-powered example application using .NET Aspire and Temporal.io. I will cover local development with Aspire’s AppHost and containerized services, move into Kubernetes deployments with autoscaling, and integrate full observability using OpenTelemetry. In part two of this series I’ll cover payload and encryption codecs in Temporal and deployments of this entire application to a local k8s cluster.
The code for this blog post can be found on my Github repo aspire-temporal-one.
Goals
- Set up .NET Aspire
- Orchestrate workflows using Temporal.
- Build API endpoints that trigger workflows.
- Run a dedicated worker to execute activities.
- Observe logs, traces, and metrics via Aspire.
- Enable smooth local-first development.
Project Structure
TemporalAspireDemo/
├── AppHost/               # Aspire app host
├── Api/                   # Minimal API to trigger workflows
├── Worker/                # Executes workflows and activities
├── Workflows/             # Reusable workflow/activity definitions
├── ServiceDefaults/       # Shared OpenTelemetry config
Durable Workflow Execution
Let’s talk about durable workflow execution and how it came to be. Since I’ve started my career in tech in the last millenium and building resilient systems has been a focus for me for some time, I’ve been lucky enough to have seen the progression.
This has come in 5 key waves, or paradigm shifts if you will. You can read more about this in the primer article.
This article starts to explore that from a developer implementation perspective.
.NET Aspire Introduction
.NET Aspire is a new opinionated stack for building cloud-native .NET applications, spearheaded by David Fowler and the ASP.NET team at Microsoft. It focuses on solving the orchestration complexity that comes with modern distributed applications, namely helping developers manage service composition, local development environments, diagnostics, and deployment.
Aspire introduces a developer-first model for composing microservices, background workers, and dependencies like Postgres or Redis through a unified AppHost and dashboard experience. It shines especially during local-first development — where spinning up a full stack of services becomes a single dotnet run away.
As it evolves, Aspire aims to become the default entry point for .NET developers building modern, observable, production-ready applications that span multiple services, environments, and cloud providers.
Temporal Introduction
Temporal is a durable execution engine designed to make writing fault-tolerant, long-running workflows feel like writing simple code. It handles retries, state persistence, timeouts, and failures behind the scenes — allowing developers to focus on logic, not infrastructure.
Temporal can be run in production in two primary ways:
- As a managed cloud service (Temporal Cloud)
- As a self-hosted cluster, which involves:
- The Temporal Server itself
- A datastore (e.g. PostgreSQL or Cassandra)
- The Web UI for managing workflows
- Optional components like ElasticSearch for visibility
For development, the Temporal CLI provides a simplified temporal server start-dev mode that spins up a minimal instance of the server, UI, and database — perfect for local testing.
Temporal is ideal for coordinating microservices, handling retries across failures, modeling complex business processes, or anything that needs distributed reliability as a first-class concern.
Temporal Workflow Basics
We’ll use a simple SimpleWorkflow in this first iteration that has two activities, and between each is a condition that waits for a signal to continue:
[Workflow]
public class SimpleWorkflow
{
    private bool _continueWorkflow;

    [WorkflowSignal]
    public Task Continue()
    {
        _continueWorkflow = true;
        return Task.CompletedTask;
    }

    [WorkflowRun]
    public async Task<string> RunAsync(string input)
    {
        Workflow.Logger.LogInformation("Workflow started with input: {input}", input);

        var result = await Workflow.ExecuteActivityAsync<Activities, string>(
            a => a.SimulateWork(input),
            new ActivityOptions { StartToCloseTimeout = TimeSpan.FromSeconds(120) });

        Workflow.Logger.LogInformation("Waiting for continue signal...");
        await Workflow.WaitConditionAsync(() => _continueWorkflow);

        var final = await Workflow.ExecuteActivityAsync<Activities, string>(
            a => a.FinalizeWork(result),
            new ActivityOptions { StartToCloseTimeout = TimeSpan.FromSeconds(120) });

        Workflow.Logger.LogInformation("Workflow completed.");
        return final;
    }
}
We have two simple activities:
[Activity]
public async Task<string> SimulateWork(string input)
{
    ActivityExecutionContext.Current.Logger.LogInformation("Activity running with input: {input}", input);

    var sw = System.Diagnostics.Stopwatch.StartNew();
    await Task.Delay(1000, ActivityExecutionContext.Current.CancellationToken);
    sw.Stop();

    _metrics.ActivityDurationMs.Record(sw.Elapsed.TotalMilliseconds);

    ActivityExecutionContext.Current.Logger.LogInformation("Activity completed.");

    return $"Processed: {input}";
}

[Activity]
public async Task<string> FinalizeWork(string input)
{
    ActivityExecutionContext.Current.Logger.LogInformation("Final activity running with input: {input}", input);

    var sw = System.Diagnostics.Stopwatch.StartNew();
    await Task.Delay(1000, ActivityExecutionContext.Current.CancellationToken);
    sw.Stop();

    _metrics.ActivityDurationMs.Record(sw.Elapsed.TotalMilliseconds);

    ActivityExecutionContext.Current.Logger.LogInformation("Final activity completed.");

    return $"Finalized: {input}";
}
Shared Configuration via ServiceDefaults
Add OpenTelemetry support here to keep things DRY:
public class WorkflowMetrics
{
	public Counter<long> StartedCount { get; }
	public Histogram<double> ActivityDurationMs { get; }

	public WorkflowMetrics(Meter meter)
	{
		StartedCount = meter.CreateCounter<long>("workflow.started.count");
		ActivityDurationMs = meter.CreateHistogram<double>("workflow.activity.duration.ms");
	}
}
Worker Setup (uses Aspire Worker template)
var builder = DistributedApplication.CreateBuilder(args);

builder.AddServiceDefaults(
    metrics => metrics.AddMeter("WorkflowMetrics"),
    tracing => tracing.AddSource("Temporal.Client", "Temporal.Workflow", "Temporal.Activity")
);

builder.Services
    .AddTemporalClient(opts =>
    {
        opts.TargetHost = builder.Configuration.GetConnectionString("temporal");
        opts.Namespace = "default";
        opts.Interceptors = new[] { new TracingInterceptor() };
    })
    .AddHostedTemporalWorker("my-task-queue")
    .AddWorkflow<SimpleWorkflow>()
    .AddScopedActivities<Activities>();

builder.AddProject<Api>("api").WithReference(temporal);
builder.AddProject<Worker>("worker").WithReference(temporal);

builder.Build().Run();
API Setup
The API exposes a /workflow/start endpoint that triggers workflows:
public record WorkflowStartResponse(string WorkflowId);

app.MapPost("/start/{message}", async (
        [FromRoute] string message,
        ITemporalClient client,
        WorkflowMetrics metrics) =>
{
        metrics.StartedCount.Add(1);

        var workflowId = $"simple-workflow-{Guid.NewGuid()}";
        await client.StartWorkflowAsync(
                (SimpleWorkflow wf) => wf.RunAsync(message),
                new WorkflowOptions(workflowId, Constants.TaskQueue));

        var response = new WorkflowStartResponse(workflowId);
        return TypedResults.Ok(response);
})
.WithName("StartWorkflow")
.WithOpenApi();
A signal to send it the notification to continue:
app.MapPost("/signal/{workflowId}", async ([FromRoute] string workflowId, ITemporalClient client) =>
{
        var handle = client.GetWorkflowHandle(workflowId);
        await handle.SignalAsync<SimpleWorkflow>(wf => wf.Continue());
        return TypedResults.Ok();
})
.WithName("SignalWorkflow")
.WithOpenApi();
And finally an endpoint to collect the results:
public record WorkflowResultResponse(string Result);

app.MapGet("/result/{workflowId}", async ([FromRoute] string workflowId, ITemporalClient client) =>
{
        var handle = client.GetWorkflowHandle(workflowId);
        var result = await handle.GetResultAsync<string>();
        return TypedResults.Ok(new WorkflowResultResponse(result));
})
.WithName("WorkflowResult")
.WithOpenApi();
With those in place our API endpoints and Temporal workflows are in place. Let’s move on to our Aspire AppHost.
Local AppHost Configuration
I mentioned earlier that Temporal can be self-hosted, and this article uses that in a special form.
We could use Aspire to pull in the specific containers, which include:
- The Temporal Server
- The Temporal Admin UI
- A datastore such as Postgres or Cassandra
Developer Temporal options
However, for anyone that has less than 16GB of RAM, your machine is going to struggle running Rider (or worse, Visual Studiop 2022), with Docker Desktop / Rancher / Podman for container support, and these three containers.
Help is at hand. Temporal also offer a dev server and Temporal CLI. This runs a cut down container with all three components supported. However running the CLI dev server as an executable isn’t helpful with Aspire because it would be a dependency that can’t be easily referenced in service discovery.
Even better, there is an Aspire Temporal extension that provides this as a container. This is way more lightweight than running Temporal Server, Temporal UI and Postgres on your local machine. Compared to the CLI which doesn’t plug well into the Aspire framework, this is a perfect balance for Aspire led development (git-pull-f5-development) and the separation of concerns for deployment, especially if you already have a Temporal self hosted or cloud instance.
So, let’s use AddTemporalServerContainer to add a lightweight Temporal dev server with Aspire:
// using Infinity.Aspire.Temporal
var temporal = await builder.AddTemporalServerContainer("temporal", b => b
    .WithPort(7233)
    .WithHttpPort(7234)
    .WithMetricsPort(7235)
    .WithUiPort(8233)
    .WithLogLevel(LogLevel.Info));

// this will be useful later for our Aspirate output
temporal.PublishAsConnectionString();

builder.AddProject<Api>("api").WithReference(temporal);
builder.AddProject<Worker>("worker").WithReference(temporal);
External API References (Temporal Cloud)
Aspire is missing external API references presently. There have been a few attempts to provide something towards it from the community but it’s currently a gap from the Aspire team that is being tracked (see: dotnet/aspire#3108 dotnet/aspire#2311). For our use case we’d need something like this (top of my head):
IResourceBuilder<TemporalServerResource> temporal;
if (builder.Environment.IsDevelopment())
{
	temporal = await builder.AddTemporalServerContainer("temporal", b => b
		.WithPort(7233)
		.WithHttpPort(7234)
		.WithMetricsPort(7235)
		.WithUiPort(8233)
		.WithLogLevel(LogLevel.Info)
	);
}
else
{
    // this won't work
	temporal = builder.AddExternalEndpoint("temporal", "my-namespace.my-account.tmprl.cloud:7233")
		.WithGrpcHealthCheck("etc");
}
temporal.PublishAsConnectionString();
I’m going to forget about that for the moment and focus on the self host option. If anyone from the Temporal .NET SDK team want to contribute the cloud support to .NET Aspire community then I’m sure it would be very welcome.
Demo Walkthrough
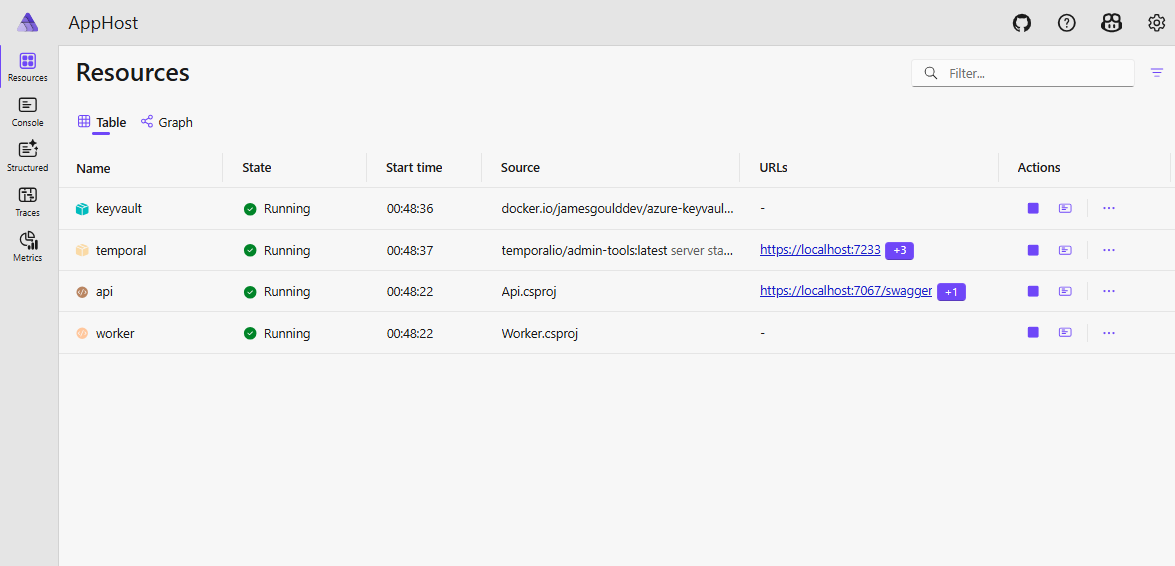
Running the AppHost first loads the Aspire dashboard and lists all of the resources in your distributed application:
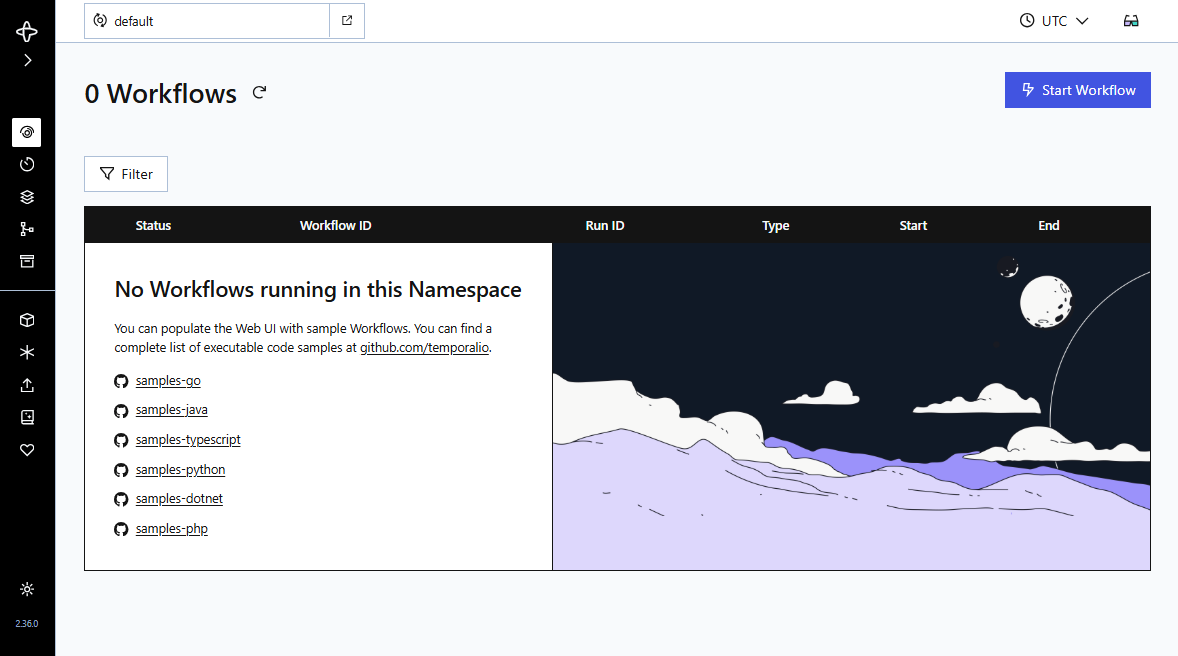
We can open up the Temporal UI and see the workflows running or run in this namespace (currently none):
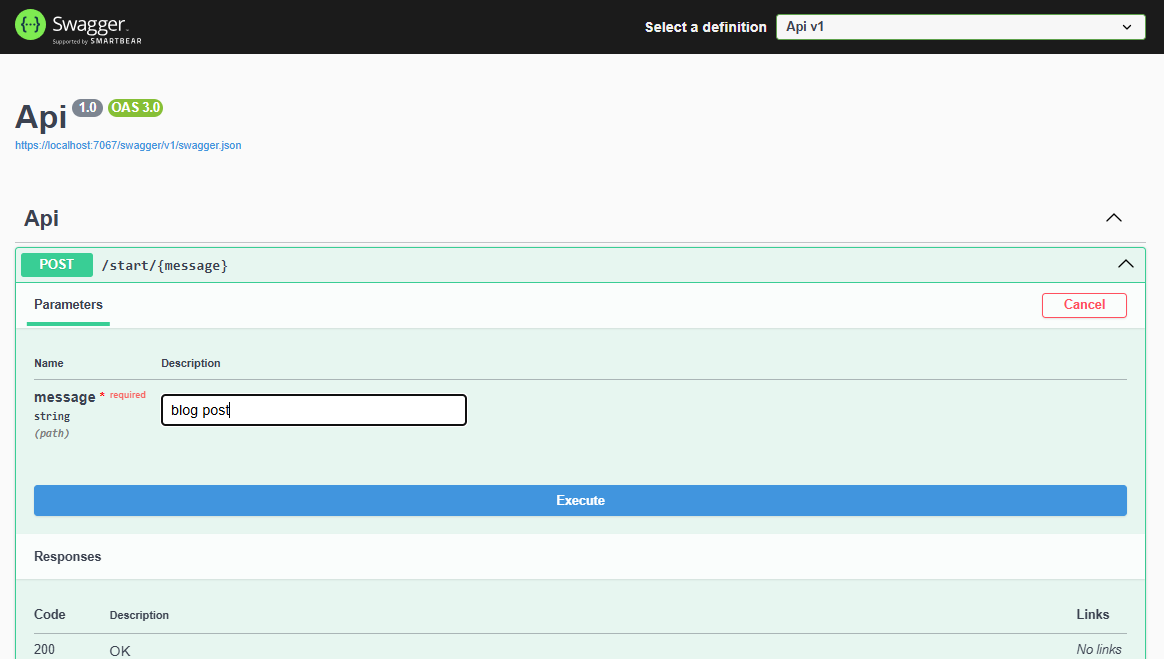
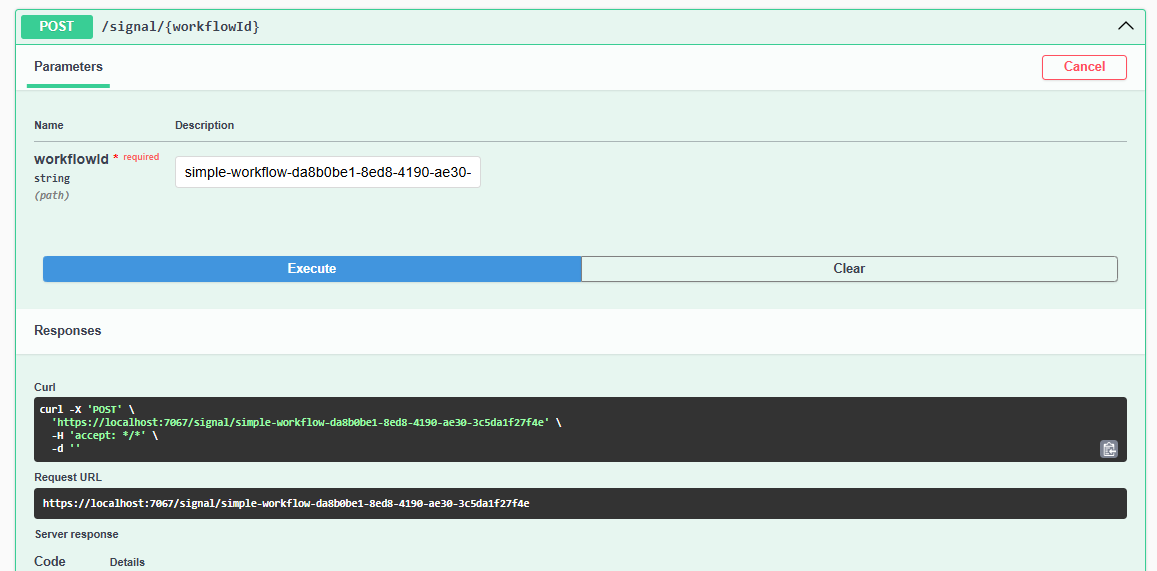
We can also open up our UI (using Swagger UI) and kick off some API requests to move this demo on. Let’s start by sending a message:
We get a response from the API that includes the workflow ID.
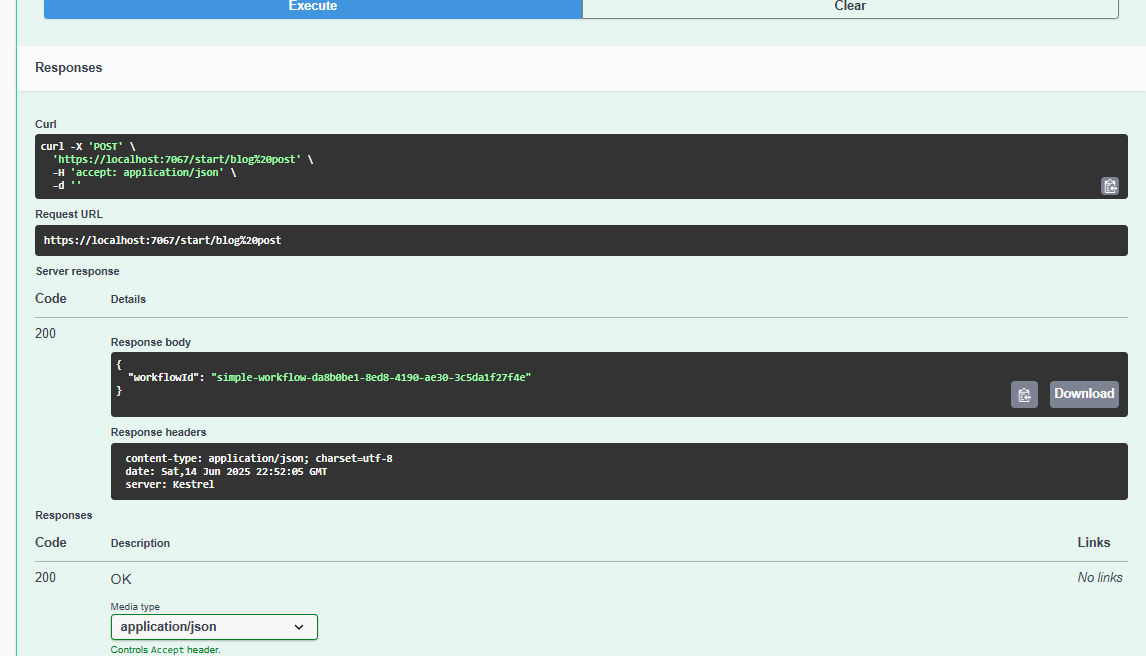
We’ll need this to signal this workflow:
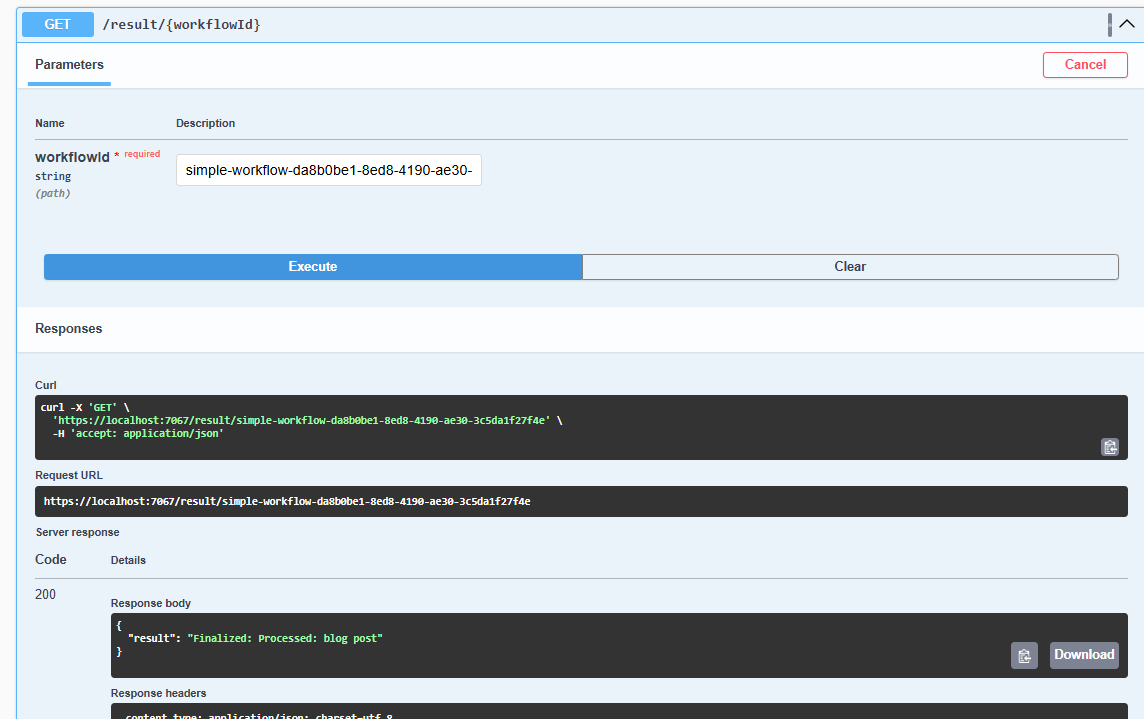
And finally we will retrieve the final result of the workflow:
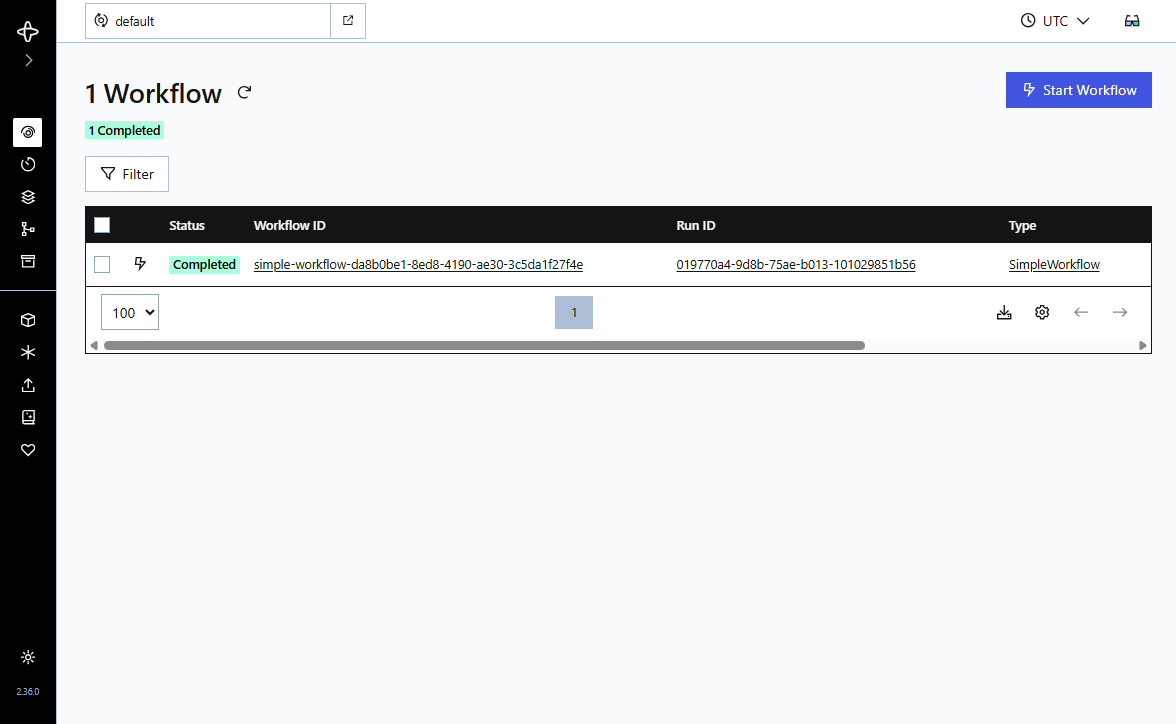
Returning to the Temporal UI we can we there is now a workflow instance that has run:
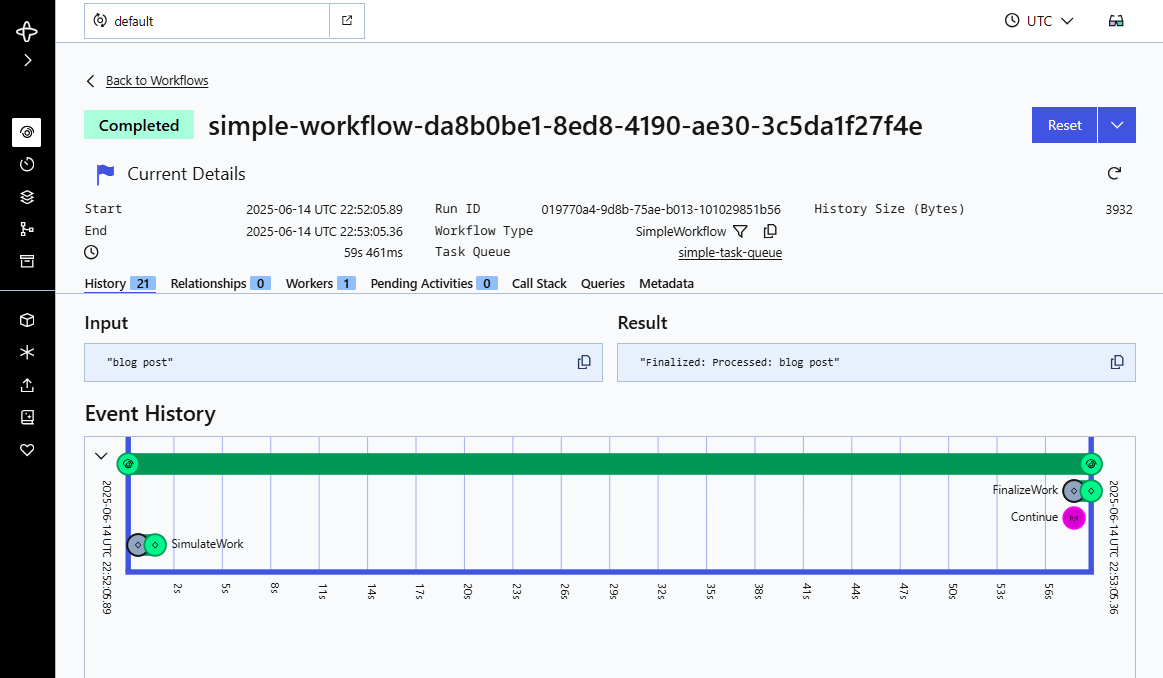
And we can click on that workflow instance and see how it run and what payloads were sent and output:
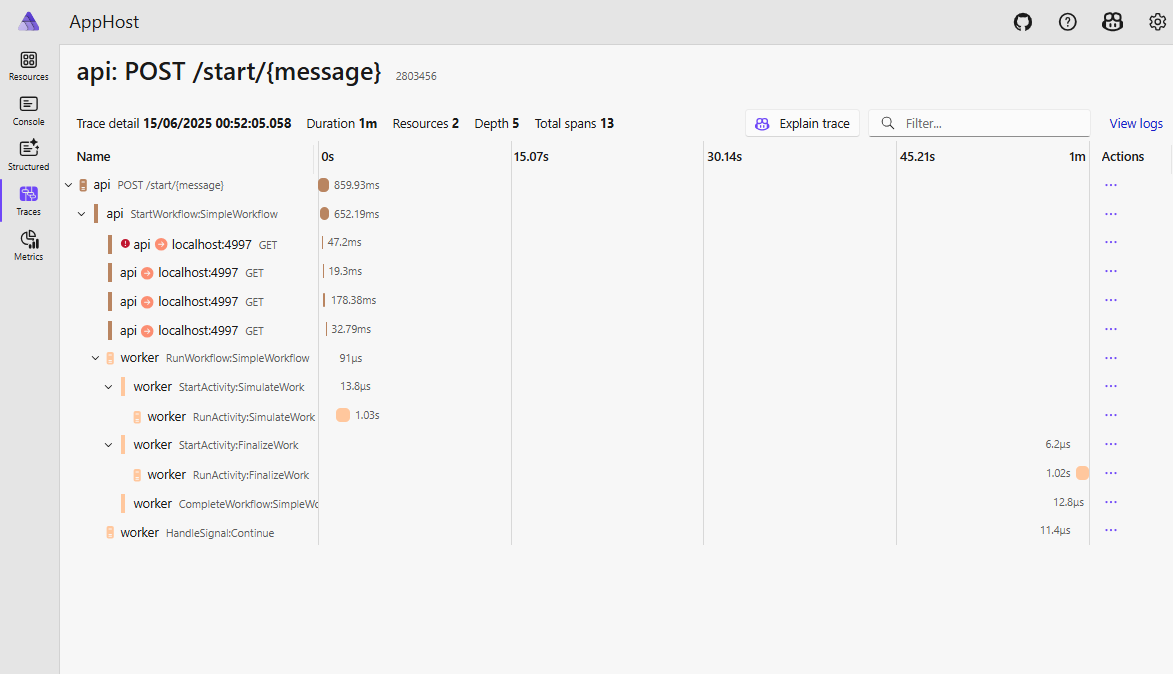
Back to the Aspire Dashboard and it gives us all the OTEL information we need as distributed traces. This is one of the killer features of Aspire. No longer do you have to deploy your application to test your OTEL based DataDog integration (or whichever SaaS application monitoring solution you use), since this uses costly SaaS resources, might not even be allowed by your ops team from a local instance, and otherwise forced into an annoying code-deploy-test-code cycle. You can see exactly how your OTEL based applications work locally using the Aspire logging, tracing, and metrics from your applications locally, and that rocks.
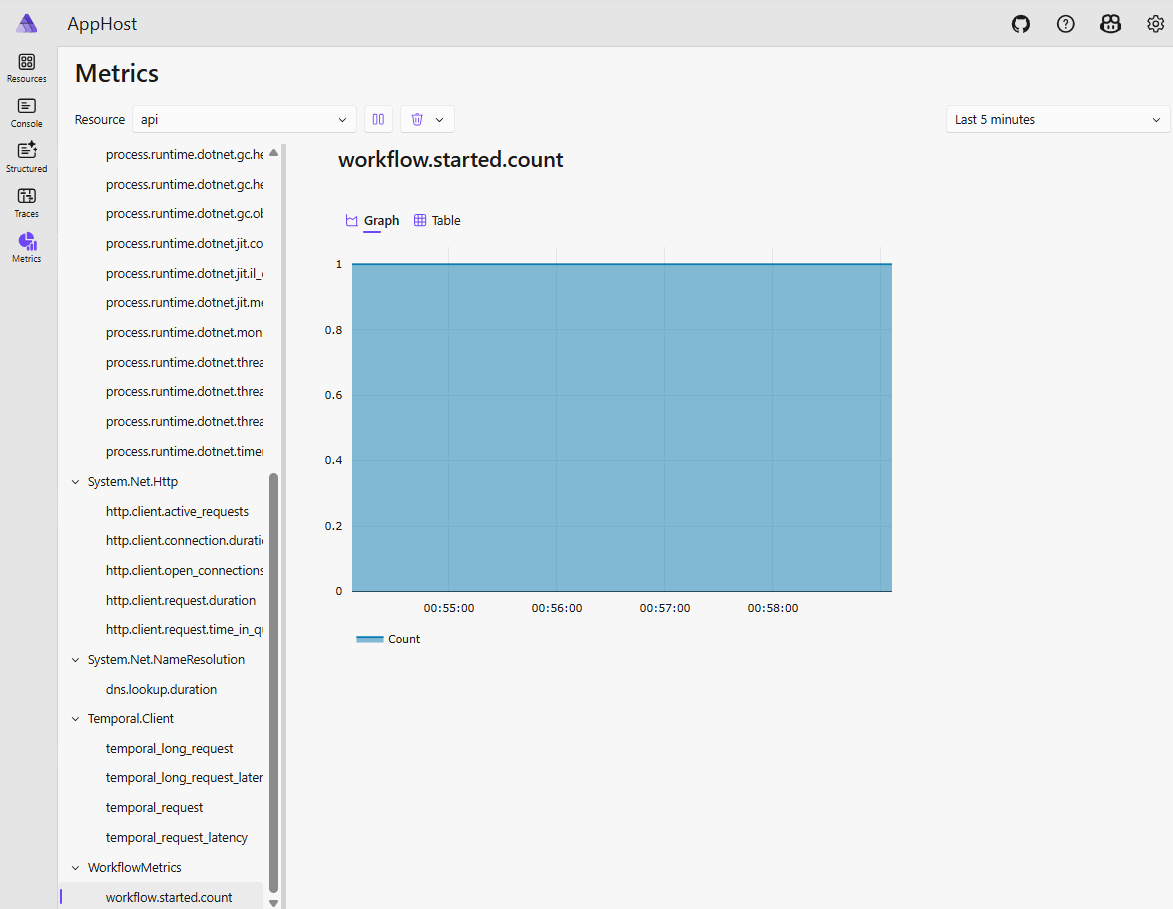
It even supports your custom metrics:
Gotchas
- Nothing of note
Next steps
My next steps will be show you how to deploy the Aspire distributed application to k8s in part 2. Since I don’t want to use cloud based resources that cost me money, I’m going to use a k8s cluster locally - yes that’s possible. I’m going to show you how to generate the helm charts, install the required components and deploy it using kubectl.
Feedback
If you want to provide feedback then leave a comment, or if you see a typo or error, then add a pull request via the suggest changes!
Full source code https://github.com/rebeccapowell/aspire-temporal-one